
Before & After: Home Renovation
- Lauren Wood
- Aug 13, 2021
- 8 min read

A complete rundown of our home renovation, which was completed in under four months and cost less than $50,000!

I always say our house “just needed a little bit of lipstick.” When we moved in, we knew we’d have to make some major changes to make it our own. But that really only required some paint (okay, A LOT of paint), replacing the counters in the kitchen, glazing some tile and redoing the floors downstairs. No knocking down walls, replacing tiles, or any major demo work other than taking out the existing floors. We outsourced most of the major work but also did a lot ourselves.
We closed on our home in late July and got the keys in early August. The first thing we did is to hire flooring contractors to come in and demo the existing flooring in the downstairs. The floors were a combination of white tile, travertine tile and hardwood mixed throughout. The company we purchased flooring though outsourced the demo work and demo’d the floors first, then installed the new flooring. We chose a grey-brown waterproof laminate wood floor that’s super durable because of the dogs. It’s essentially scratch resistant… and cheap (bonus!) but still looks great.
We also had to rip out the hideous hunter green carpet on the stairs and in the landing, and installed a new gray carpet. This was done through the same company who we used for the wood flooring. All in, the cost for the demo work, the wood floors and the carpet was about $16,000.
After the floors were replaced, we hired painting contractors to paint most of the downstairs (formal living room, formal dining room, family room and kitchen), as well as the stair banister and all the built-ins.


Our main goal in the renovation was to “get rid of” the look of red oak anywhere it was in the house. And there was A LOT of it. So that meant sanding and painting it—professionally of course since it can go poorly if not done correctly—instead of replacing it, as this was how we kept the reno cost pretty low. We learned about the importance of property treating and paint wood the hard way after our first painting contractor didn’t do it correctly, and the paint would scratch off with a fingernail. After watching them paint without sanding the wood first, we knew they didn’t know what they were doing. Thankfully we found a new contractor eventually who did it right.
We had the walls painted a couple different shades of light gray and then painted the kitchen cabinets, built-ins and stairway banister a bright white.
After the painting was done, we replaced the kitchen countertops (which was an old, white tile that had been there since they built the home in the 90s) with a white Carrera marble. It was easily the most expensive part of our renovation, but 100% worth it. After having the cabinets painted, I ordered drawer pulls from Amazon and had them professionally installed. And that’s pretty much all we did—a pretty drastic kitchen remodel (which would typically cost upwards of $70k) for about $20k. We’ll eventually need to replace the appliances to update them a bit, but they work, so for now we’re keeping them.
You can shop our entire nursery by clicking the products above.
Or shop all my favorite products by following me on LTK.
The “good” painters charged about $7,000 to paint the kitchen cabinets, the built-ins in the family room and the stairway banister. We paid about $2,000 to the first company to paint the walls.
Then we hired a tile glazer to glaze the green marble fireplace in the formal living room (which cost about $150), the shower in the downstairs guest bathroom (another $150), the travertine fireplace and surrounding tile in the family room ($300) and both the shower and the countertops in the upstairs guest bathroom ($750).
That’s the extent of what we had professionally done. Now here’s what we did ourselves:
Both companies who we hired to paint gave us INSANELY expensive quotes to paint the wood around the fireplace in the formal living room and an upstairs cabinet in our landing. The quote was $5,000 to paint both, so I decided to paint them myself. I sanded them thoroughly (probably more than I needed to, but just to be safe), cleaned them well, primed them with several coats of an oil based primer, and finally added two coats of bright white in a super durable, high quality paint. It was definitely a process, but worth saving five grand. Since most of the cost that was quoted was for the labor, this cost me only about $150 for the paint and sanding materials.
Here is a video of the process it took to sand and paint the mantle in the formal living room:
Here is a video showing the cabinet refinishing and painting:
Then I remodeled the entirety of the half bath downstairs. I painted the walls and ceiling gray (I wouldn’t have painted the ceiling, but for the fact that the existing tan paint went all the way onto the ceiling as well), painted the baseboard trim white, added some gray palm print wallpaper (the “old school” paper and glue kind!) and then had Byron help me install a new light fixture and faucet. All-in, this probably cost around $600.
I also had to prime and paint the decorative tile around the fireplace in the family room because the tile glazer said he couldn’t glaze it. This was free, since I already had the primer and the paint for the formal living room mantle and the cabinet upstairs in the landing.
We swapped out all the light fixtures in the kitchen, formal living room, formal dining room and entryway. Byron actually had to install the giant orb chandelier that we bought for the entryway because our handyman refused to do it. This fixture was the most expensive—we purchased it during a Memorial Day sale for $1200 when it would normally cost about $3,000. Then I shopped Wayfair and Overstock for the orb lighting we purchased for the formal dining room and casual dining room. These were approximately $600 total, including installation.
We didn’t do much to the downstairs bathroom actually—and it might be a project for later—but for now, with some tile glazing and some paint it looks much better. The shower is a new bright white and I added some shelves to the wall above the toilet. I also swapped out the towel bars, toilet paper holder, and towel ring to match the faucet, as they were mismatched metals before. With the glazing included, this room cost a few hundred dollars.
The baby room upstairs and guest bathroom next door are where I did the most work. When we moved in, we knew we wanted children but weren’t yet pregnant. So I turned one of the bedrooms upstairs into a guest bedroom. This room apparently used to be a children’s room, and had light blue paint on one wall and a burgundy window mural on the other. The FIRST thing I did after we moved in was to cover up the mural with wallpaper and paint the light blue wall white. I added a peel n’ stick blue palm print wallpaper over the mural to make an accent wall, then used the room as a combo guest room and workout room (since I put my Peloton in there).
When we found out we were pregnant about A MONTH later, I was bound and determined to keep the wallpaper I had JUST put up. So whether it was going to be a boy or a girl, I had decided to go with a tropical theme to work with the existing wallpaper. A little girl’s room was going to be a little bit trickier since the print is blue, but we were going to make it work. Thankfully, our babe ended up being a boy.
So a couple months later I swapped out the shelves for white ones and then replaced the ceiling fan for a white one. That’s about all we did to change this room (other than to add furnishings), so the cost for this was about $250 (wallpaper included).
Here is a before and after video showing some of the things I did to transform our "window room" from a guest room into a baby nursery:
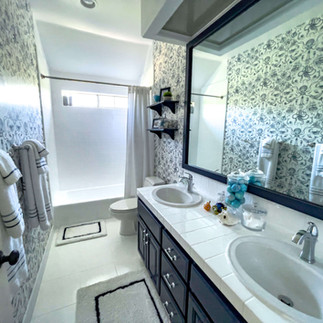
Next door, in what is now going to be Tristan’s bathroom, I remodeled it almost entirely on my own. The only thing I didn’t do is the tile glazing (since it’s a very toxic, arduous process). I sanded and then painted the vanity cabinet a navy blue color, added a frame to the existing mirror to make it look a little nicer, swapped out the towel bars, toilet paper holder and towel ring, and added some shelves that I painted to match the vanity. The biggest change was adding the deep sea themed wallpaper (which I did all on my own!) and painting the floor. Painting the floor was a pretty laborious process, but totally worth it since I didn’t have to rip out the existing tile floors!
I mostly followed the directions of Driven by Decor’s tutorial. I cleaned the floor really well with a heavy duty tile and grout cleaner, then did a light sanding with a power sander tool like this one. Then I added two coats of heavy duty floor primer, waiting 48 hours in between coats. Then I added two additional coats of floor and porch paint. The key to this working well is patience and actually waiting until the floor is completely dry (which makes it a time-consuming process too, but worth it).
The cost for this bathroom renovation consisted of mostly paint and wallpaper, so it wasn’t much. The tile glazing (mentioned above) cost the most, at $750. The cost for wallpaper and paint was another $200. Towel bars, mirror frame and smaller items were another $200. So about $1,150 total.


I wanted to include costs to show how you can do what looks like a major renovation for not as much money as most contractors will quote you. As I mentioned at the beginning of this post, we spent about $50k total for these renovations, and our house appraised for almost $300k more 6 months after purchasing it. Sure, some of this had to do with the market, but a lot of it was because of the renovations we did. 600% ROI? I’ll take it.
Here is a video showing the final product:
Here are the links to all the products mentioned and home furnishings shown in the photos:
FORMAL DINING ROOM:
60" ROUND DINING TABLE: https://rstyle.me/+SJ_YugjnQy-lH9ZizeQVyA
SPUTNIK CHANDELIER: https://rstyle.me/+E8DYc-ySsNUnxItXIr_FPg
BLUE AREA RUG: https://rstyle.me/+cDIlvxquML9fGuKQvHFarQ
BLUE VELVET CHAIRS: https://rstyle.me/+5G7etbGi1mEt1po7dY_4DA
DECORATIVE BOWL: https://rstyle.me/+WNlxo7wW0eTf7C3HZmBEjg
DECORATIVE BALLS: https://rstyle.me/+PT2kJau0gT_hl-i_YxLvqw + https://rstyle.me/+i2Rdx11-1GcpHAeR5xOIAw
FORMAL LIVING ROOM:
MARBLE COFFEE TABLE: https://rstyle.me/+yYmfnDucmyexahalEiUpZg
COUCH (SIMILAR): https://rstyle.me/+ERUc70sOV4POHvOpTneL3g
NAVY VELVET ARMCHAIR: https://rstyle.me/+pvtM0URP4ZPwOxG3U5jDPQ
WOVEN NAVY PILLOWS: https://rstyle.me/+0eU62vcLfC60DCqJXubodA
LIGHTER BLUE PILLOWS: https://rstyle.me/+JBXrOXIpN9tjmWPEoh-mMA
SMALLER KNIT NAVY PILLOWS: https://rstyle.me/+qV67XOtrK5fca1O5RW1bNA
FAMILY ROOM:
GREY/IVORY RUG: https://rstyle.me/+xGErIGV-t39jITI6QoBQVQ
SPUTNIK CHANDELIER: https://rstyle.me/+pL1LeAk2m81BlnamFu4tTA
COUNTER BAR STOOLS: https://rstyle.me/+uLGIDTK8GBhaNs6tXvVm8A
NAVY VELVET CURTAINS: https://rstyle.me/+9b4Be2TSJAGywBAfJ6tNfQ
NAVY VELVET PILLOW COVERS: https://rstyle.me/+zPE0oFt0TyCzHaf9t7mxfA
NAVY KNIT THROW: https://rstyle.me/+2_pUCtnmJ1K17EImUiF5JA
BABY NURSERY:
WALLPAPER: https://rstyle.me/+VZuYx9iJdwC8JdAV965lhQ
CHANGING PAD COVER: https://rstyle.me/+jbZ8ljZ9OEf76zNaLhoeTQ
PALM TREE: https://rstyle.me/+08U1eznwhMDE42QV58xJbg
WICKER GIRAFFE: https://rstyle.me/+yHz99eClqXJTRAJUA2yySQ
(or similar: https://rstyle.me/+breKmclc2SdQ1mrJ0WWsDg )
FAUX SHEEPSKIN RUG (to line wicker giraffe basket): https://rstyle.me/+YreBkXZwzfH1GiyU49e9NA
CEILING FAN: https://rstyle.me/+PPOUNmEwB8qqX0CPkmV-Ww
PALM PRINTS: https://rstyle.me/+K4rMZyl2KTS-b6TBabnYWA
(OR SIMILAR: https://rstyle.me/+V2_XG638Q0mKacUlMBOZdw )
ANIMAL PRINTS: https://rstyle.me/+myqtgaeIn5_pXoQMEQLVOg
PALM CRIB SHEET: https://rstyle.me/+2MmkWgabIh_IHZirl9Odlw
TROPICAL PRINT PILLOW: https://rstyle.me/+DMHQaWDdml2JZBmSMBnyRA
KIDS' BATHROOM:
FLOOR PAINTING TUTORIAL: https://www.drivenbydecor.com/how-painting-bathrooms-ceramic-tile-floors-diy/
TILE & GROUT CLEANER: https://amzn.to/3yDhyac
SANDER: https://amzn.to/3AruEbk
PRIMER: https://amzn.to/3jFPUTH
FLOOR PAINT: https://amzn.to/3xCBDfw
BATHROOM WALLPAPER: https://rstyle.me/+ev4iNand41X529Dgsc5jyA
FLOOR MAT: https://rstyle.me/+C_n3J9XVD_fT8Pp7VmpXcg
APOTHECARY JARS: https://rstyle.me/+-DtqxCi6tFi7cbu_mYDIsA
GLASS CANISTERS: https://rstyle.me/+0awaTSNpEmGcJcIxw0Eo5A
SOAP/LOTION PUMP: https://rstyle.me/+4zgO3E0eI1R7BRw08ovDZw
SHOWER CURTAIN: https://rstyle.me/+9WhSKKIrcCcNF313rGhHzg

Pin this photo on Pinterest to refer back to it at a later date!
Questions? Comments? I'd love to hear your thoughts or answer any questions. Email me directly at info@travelisthecure.com
If you enjoyed this post, I would really appreciate a social share, or a follow on Instagram and Facebook.
For more destination guides, browse a list of Destinations A to Z. Head over to my Tips page for everything from packing guides to travel products and camera gear. To shop the items I love most when I travel, shop my Amazon Storefront.


Let’s be real—domestic cleaning in Manchester isn’t exactly anyone’s favorite hobby. Why scrub the tub yourself when you can hire someone who actually enjoys it? 😆 Professional cleaners are the unsung heroes of our daily lives. They come in, do their magic, and leave your space looking pristine. For those who want to treat themselves and also save a bit, eMop offers cashback up to £150, making it feel like a win-win. Their site https://www.emop.co.uk/manchester has all the details if you’re thinking of making the leap. Whether you need someone to deal with weekly chaos or just an occasional deep clean, they’ve got you covered. And honestly, once you experience that level of clean, it’s hard to go back. Think of…